How to Make a Word Document Read Only

Making your Word document read-only will limit the user’s ability to create new content in the document or make changes to existing content. In this tutorial today, you’ll learn about four different ways you can make your document read-only.
Before we dive into the details, below is a brief solution to perform this task.
To make your Word document read-only, click on the Review tab, in the Protect category, click on Restrict Editing to display the Restrict Editing pane. Under the Editing restrictions, check the checkbox and select No changes (read-only) from the drop-down. Under Start Enforcing Protection, click on Yes and enter your password.
Below is a more detailed and more option on how to make perform this task.
Option 1: Using Restrict Editing to make a Word document read-only
One of the effective ways to make a Word document read-only is the use or Restrict Editing command.
As the name implied, it allows you the option to restrict all kinds of editing within the document. It also allows you the option to restrict only some type of editing. With this option, you can even allow only some users to make editing if you are on a network.
Without further ado, below are the steps to make your Word document read-only using the Restrict Editing command.

- Under the Protect category, click on Restrict Editing.

- The Restrict Editing pane will appear.
- Under Editing Restriction, check Allow only this type of editing in the document:
- Click the drop-down and choose No changes (Read only)
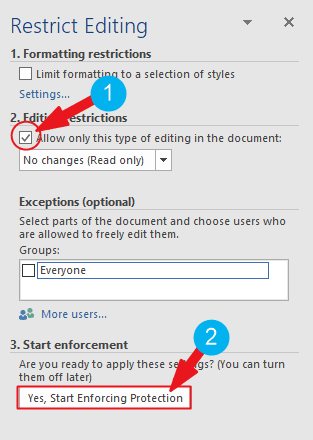
- Under Start enforcement, Click on Yes, Start Enforcing Protection.
- The Start Enforcing Protection dialog will appear.
- Under the Protection Method, click on the Password radio button.
- You can create a password so that anyone trying to stop the editing restriction of the document must have the password. This option is completely optional.
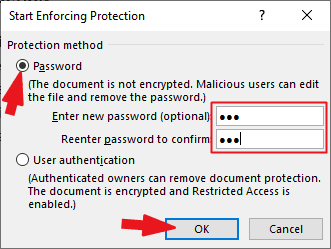
- Click on OK to make your Word document read-only.
These are the steps to this task using the Restrict Editing option.
Option 2: In file’s properties before opening
Another simple way to make your Word document read-only is to leverage the document’s properties before launching it.
Just obey the steps below to learn how:
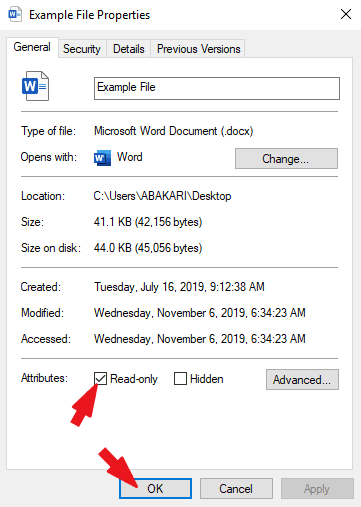
- Go to where the file is located. It could be on Desktop or in a Folder.
- Right-click on the Word document file and choose Properties from the shortcut menu.
 the file and select properties" width="330" height="200" />
- The file Properties dialog box appears.
- Check the Read-only checkbox.
The Word document will now open in Read-only mode as shown in the screenshot below:

Option 3: Using the Save As dialog to make Word Document read-only
This option takes advantage of the Save As dialog box settings.
- Open the document you want to make read-only.
- Press F12 to open the Save as dialog box.
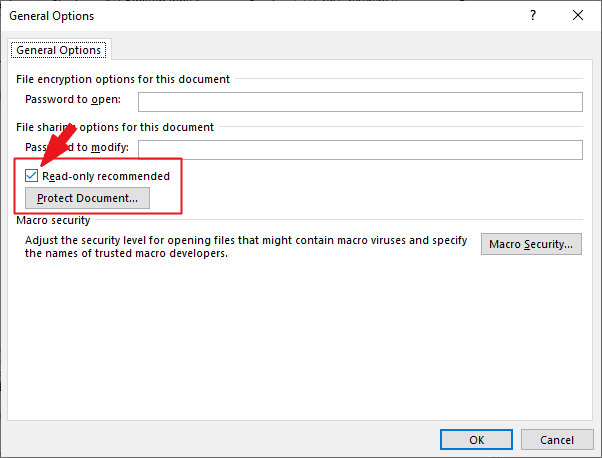
- At the bottom of the dialog, click on Tools>General Options…
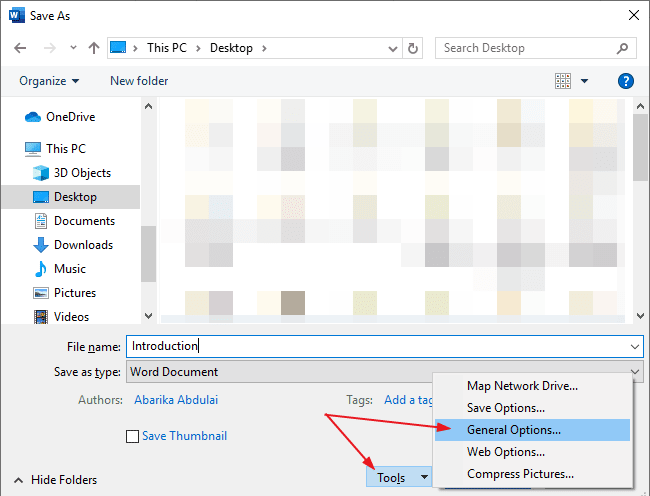
- The General Options dialog appears.
- Check Read-only recommended.
- If this is the first time saving the document, you’ll have to specify the file name and location.
- When users open up the file, they get a prompt whether to open the document as read-only or not. It means that this option doesn’t prevent unauthorized users from editing the document, it only prevents users from accidentally changing the document’s content.
Option 4: Enable read-mode in Word Using Password to Modify
This option is very similar to the previous one. It just involves adding another step.
- Open the document you want to make read-only.
- Press F12 to open the Save as dialog box.
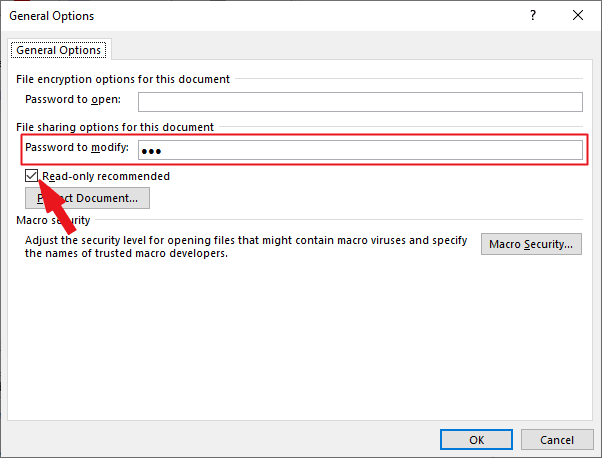
- At the bottom of the dialog, click on Tools>General Options…
- The General Options dialog appears.
- In the Password to modify: text box, enter a password. This means that no one can make changes to the document unless they enter the correct password.
- Click to check Read-only recommended.
- Click OK.
- The Confirm Password dialog appears. Re-enter the password and click OK.

At this point, the Word document will now become read-only. The password you used will be required before the document can be edited.
